Wednesday, July 03, 2013

Laptop with external Graphics for gaming


Fun concept i came across, i have a pretty good laptop lying around (Lenovo W510) which sports a quad i7 and a decent graphics card and I'm able to game on higher settings than my Xbox 360 can manage. In the never ending pursuit of perfection though it wasn't enough and i decided to explore options to upgrade the GPU without putting loads of cash down for a new PC.

My laptop conveniently has a mini Expresscard 2 slot and this allows me to hook up a mini-PCIE to PCIE 16 adapter allowing me to plug in a full on PC graphics card. While there is a pre-made solution available called the ViDock i found the cost prohibitive and there is some uncertainty regarding larger graphics cards actually fitting in their enclosure.

Shopping list
  1. PE4H PCIe passive adapter (Link)
  2. A good Graphics card (Saphire 7870 XT)
  3. A decent PSU (Power Supply unit)
I already had a 600W Power supply sitting around from my old PC so for the first two components the cost came out to 130 + 230 = $360 CAD.

Getting started

The PCIe adapter is rather plain and I was disappointing that it had no method of securing into a PC or on a board (its just a flat circuit board)
Board compared to an Arduino and a Q10

The stability is something i will have to address later as the Graphics card is MASSIVE in comparison to this board and I cannot expect the card to sit on if for extended durations.
Comparison between PCIe board and 7870 XT

Proper housing is something I will look at later, for now lets get it up and running. The PCIe kit contains a small board that can control the PSU, its snaps right into the MotherBoard connector and has a switch that can turn our entire contraption on/off.

The main PCIe board can now be connected to the PSU (it uses an archaic floppy drive connector, adapter included in the kit)

Connection to the laptop is established via the ExpressCard adapter and a mini-HDMI cable (odd choice for a cable but i guess that means its easier to replace it if soemthing happens).

  This HDMI cable then connects to the PCIe board.

Our setup (that I'm hiding in my TV cabinet frame) looks like below

The last step is to install the graphics card on this. I first connected the 6-pin power connectors (These cards are power hungry!) and then slid it into the PCIe slot.

Not too happy with the way the card is standing up due to its mounting frame on the side but I dare not remove it as its helping balance that heavy thing. WIll work on something more future-proof later.

Making things (a tad) neater

Update: I managed to get my hands on some discarded ESD safe deleron blocks and decided to use them to rest the 7870 board flat so that heavy monster can lie down while chugging away ! Ran a few benchmarks with Tomb Raider and checked the blocks after 20 minutes and dint notice any noticable change in temperature.


Software Setup

Once the Hardware was setup and ready to go I powered on the card and rebooted my laptop. When Win7 came up it detected my card as a "Standard VGA Graphics Adapter"

It took a few reboots to get to this point though so don't be discouraged if it doesn't work at first. I dint have to make any bios modifications or anything, it was just simply detected.

AT this point I downloaded the ATI catalyst drivers and installed them. Once done I had to reboot my laptop one last time, when it came back on I now saw two display adapters. To switch to the new graphics card simply ensure the external is active and disable the internal.

Benchmarking

Now we're good to go! I ran some quick benchmarks using the built-in benchmark the new Tomb Raider game has with the exact same settings. Both times the game was set on High settings and the the resolution was 720p
Internal Graphics card (old)
External Graphics card (new)
  • Average frame-rate was 21.9 FPS with the laptop's GPU and rose to 100.8 FPS with the external card (a 5X improvement). 
  • Lowest frame-rate was 6.9 FPS with the laptop's GPU and 66 FPS with the external (a 10X increase)
  • Highest was 32 FPS with the laptop and 122 FPS with the external card (a 4X improvement)
Now Tomb Raider 2013 is one of the best looking games on the market  at the moment so i decided to try out the benchmark on "Ultimate Settings", the results was a gorgeous looking game that never saw the framerate drop wile running at 1080p

The ATI card also manages to do some of the physics behinf the character's hair (Tress FX) adding to the overall immersion. Below are some example images of games running at playable framerates on my laptop now:


Conclusion

With a $350 investment i've now got something that should be comparable to next-gen consoles while still being able to get games for cheap (i picked up Tomb Raider last month for $15 and it was barely 2 months old!).

As far as laptop portability is concerned its simple, go into device manager and re-enable the internal graphics card then disable the external. Just a simple matter of disconnecting the laptop from the PCIe board and carrying on.

Issues
  • Audio stuttering: i came across an audio stuttering issue. Games work fine however videos with 2.1 sound keep stuttering very second. the solution: a registry edit. Open regedit and find
    HKEY_LOCAL_MACHINE\SYSTEM\CurrentControlSet\Contro l\Video\{XXXX...}\0000
    ( 'XXXX' means device number. There are several device number folder and u should find 'AdapterDesc' in 0000 folder which key value is 'amd radeon HD 7XXX Series'. ) At that '0000' folder, Change 'PP_SclkDeepSleepDisable REG_DWORD' value 0 to 1.
    and reboot.

Saturday, October 22, 2011

Getting started: BlackBerry Native SKD 1.0 with a simulator

NOTE: This is still a work in progress..


This took some trying....then again i have no idea how to develop in an Eclipse based IDE. I wish there was more documentation but i figured I would get started with a simple how-to on developing for RIM's new OS.

Getting the simulator up and running:


Getting the Native SDK up and running:

Trying out a sample app:

So I decided to try out the one of the sample apps on the Blackberry webpage, namely the Hello Native SDK Graphics app.

From start to finish this is what you need to do and I will try to be as details as possible (this is for the noobs like me out there!)

  1. Unzip the Folder into your NDK workspace
  2. We will be using the Managed code (because we like life being easy now dont we?). Import the project into the QNX IDE by going File -> Import -> General -> Existing Projects into Workspace -> Select the root directory to be the HelloNativeSDKManaged and click Finish.
  3. In the Project Explorer window you should see the Project. First off right click on it and set the Build Configuration to the Simulator (Build Configurations -> Set Active -> Simulator).
  4. Build the project now (right click then Build Project). You will notice in the project folder on the HDD there will now be a Simulator folder.
  5. Next we set the target device. Right click on the project and go BlackBerry Tools -> Configure Targets.. -> select "sim (Neutrino/x86)" and hit ok.
  6. Now we configure the runtime. Right click and select Run As -> Blackberry Tablet OS C/C++ Application -> Tadaa !!

Friday, May 29, 2009

Install linux without CD/USB/Floppy !

As part of a bigger project (a digital photo-frame) I have been trying to repurpose an old P3 laptop of mine that has not seen use in a few years. It had a semi-working install of Fedora Core 4 on it and I wanted to install something newer, faster and something where I could get software easily.

Heres the catch, the laptop's CD drive went bust a long time ago and being a 2001 model it has no USB boot capability. All it had was a functioning internet connection (ethernet). After a week of searching and understand how Grub boots linux I successfully installed Xubuntu on the machine !

Background:

Will keep this as simple as possible. Grub use a config file /etx/grub.conf that contains the commands used during bootup. what we need is a paragraph starting with title and contaisn the name of the distro being booted. ANything can be written here.

The next two lines below it are the locations of the Kernel and the Initrd files. These are what linux always boots first and are the key to installing a new system. They specify the location of the root partition on the hard drive for example: (hd0,0) meaning hard drive 0 and partition 0. Heres a sample of a paragraph:
title Red Hat Linux (2.4.18-0.12)
root (hd0,0)
kernel /vmlinuz-2.4.18-0.12 ro root=/dev/hda3
initrd /initrd-2.4.18-0.12.img

Now all we need are the 2 files ( the kernal and the initrd file of the system we wish to boot ).

Proceedure:

  1. First and foremost get the two files ( the kernal and the initrd file ) of the system you want to install. Two ways of doing this: if you have the distro's image (iso file ) just go into that and find them files.
  2. Place both files into the /boot folder in your root directory.
  3. Open up /etc/grub.conf in your faveroute text edditor.
  4. Add a paragraph in it. Heres what it should look like:
title My Linux installer of choice
kernel (hd0,0)/boot/your_linux_kernel_filename
initrd (hd0,0)/boot/your_initrd_img_filename

Now simply reboot the computer. When the Grub menu shows at startup simply select your newly added choice. A simple installation menu should start up and all you have to do is follow the instruction. The distro will eventually start the installation by downloading necessary components from a provided mirror.

NOTE: I know Ubuntu can automatically find mirrors to install from but I had issues with Fedora where I had to manually enter a mirror. In that case go here and select the mirror for the distro required. Make sure that the url you provide is of the os and should look like this: .../blabla/fedora/linux/core/10/i386/os/

Closing notes:

Im glad to have the laptop working again. The installation went smoothly and I was able to format the entire disk meaning the kernel and initrd files i had booted from were wiped out but during the install they were on the ram so it dint cause any issues. Make sue that the install goes uninterupted though, failing in the middle can be catastrophic.

I hope this helps. I took help for this from this website. It is more comprehensive and also explains how to do this from Windows if required.

Thursday, May 28, 2009

Fedora core 10 crashing at boot (Kernal issue)

FC10 seems to have this issue sometimes where upon bootup it hangs after:

Creating root device.
Mounting root filesystem.
mount: error mounting /dev/root on /sysroot as ext3: No such file or directory
Not sure what is happening here but I found a quick fix.
  1. Edit the grub line for FC10 being booted up
  2. Edit the kernel parameters
  3. add at the end scsi_mod.scan=sync
Should boot up just fine now.

Tuesday, February 24, 2009

Creating an ad-hoc wi-fi network on Linux

A simple how-to on ad-hoc networking.

First of all the basics, ad-hoc networks are not are slightly different from regular networks. In its simplest form an ad-hoc network possesses no DHCP server i.e. each computer has a static I.P. address and to talk to another computer it simply attempts to contact the other I.P address. No need of a switch in the middle to act as a mediator.

Now for a computer to be on the same ad-hoc network the following must be set:
  1. Wifi mode should be in ad-hoc
  2. The Essidof the network should be the same (duh ?)
  3. They should be on the same channel
a quick setup would involve the following 3 lines:

ifconfig wlan0 down
iwconfig wlan0 mode ad-hoc essid testing channel 5
ifconfig wlan0 192.168.10.10 up


Here "wlan0" is my wireless card, replace it what you have ( Type in "iwconfig" if you are certain what it might be ). The essid is named "testing", type anything creative here ( its the name of the wireless network and is visible by all so dont be too creative ). The channel# can be anything that wont be affected by local interference ( eg a local wifi router ). Lastly bring up the wifi card and choose an I.P address for it.

Do the same thing on the other computers except change the I.P address ( for eg make the next computer 192.168.10.11 ) and this way your ad-hoc network can grow.

P.S. make sure the computers are on the same cell. Type "iwconfig" and see the entry under "Cell". It should be the same for all computers on the network.

In the case that the computer misbehaves and doesnt connect to the network, destroy the network manager:
killall NetworkManager

Monday, February 23, 2009

Opening and Closing ports in Ubuntu

Took me a while to figure it out so i figured I should share it with everyone. Ubuntu has something called UFW ( Uncomplicated firewall) which can be activated at any time and told to open/close ports.Some of the basics:

sudo ufw enable

sudo ufw allow 53/tcp
sudo ufw allow 53/udp

sudo ufw status

These basic commands can be used for opening ports. See the link for more details (including how to open ports for services automatically )

Saturday, August 09, 2008

Engineering project for 2008

Here was my submission for my 4th yr engineering project. Its a multi-input interface that studies the applications of a touch-less interface in user-PC interactivity. Keep in mind this interface does not have to be limited to PCs itself and could also be used in interaction with other electronics such as TVs etc.

Enjoy!


Tuesday, August 05, 2008

Trying to run your DirectX or other VC++2008 app on another computer ? Heres what you need....

I was trying out some of my Wii project code on another computer today. Its a directX app that uses the Wiimote input for interaction and i kept getting the errors

This application has failed to start because the application configuration is incorrect. Reinstalling the application may fix this problem.

Heres the sollution:

  1. rebuld the application in release form and not debug form. in visual C++ 2008 go to Build > Configuration manager and in the "Active sollution configuration" select "Release". Now rebuild the app. You may several errors, they are covered earlier int the blog.
  2. Heres the important part. A VC++2008 app requires certain libraries to run on another computer and if that computer doesnt have visual studio you get the Microsoft Visual C++ 2008 redistributable package and this will provide your app the proper envirnment to run in.
Well have fun running the apps on different computers. Shout if anyone needs something else.

Saturday, July 19, 2008

Image scalling/translation using Wii remote and hands

More coming soon. meantime enjoy the video:

ever get the frusterating error:

error C2664: 'CWnd::MessageBoxW' : cannot convert parameter 1 from 'const char [12]' to 'LPCTSTR'

Heres a sollution:

Change your project configuration to use multibyte strings. Press ALT+F7 to open the properties, and navigate to Configuration Properties > General. Switch Character Set to "Use Multi-Byte Character Set".

Another issue when doing 3d programming is when the libraries in Visual Studio do no import the necessary functions and you get Link errors. heres the sollution:

Change your project configuration to use multibyte strings. Press ALT+F7 to open the properties, and navigate to Configuration Properties > Linker > Input. The option Additional dependencies should read "$(NOINHERIT)". click it and select the "..." button that appears beside it.This shows all the dependencies available. Make sure the checkbox "Inherit from parent or project defaults" is checked. The code should now compile.

Tuesday, June 24, 2008

Opening a serial port in C#

Just a quick tutorial, I was trying to communicate with my LCD in C# and heres the gist of how i got it up and running:

Use the Header using System.IO.Ports; we create an object using the name serial_port which looks like:
SerialPort serial_port = new SerialPort("COM7", 9600, Parity.None, 8, StopBits.One);

Here we specify the required vars - Com port name, Baud rate, Parity bit, Data bits and stop bits. Now we simply open the com port serial_port.Open(); and this allows us to read/write from the selected port. For my purposes I used write commands so as to write data to my external LCD screen. Keep in mind the write command accepts only strings so I had to improvise as I was sending it a integer value.
serial_port.Write( i.ToString() );
where 'i' is the integer I am sending accross the COM7 port.

Sunday, June 08, 2008

Establishing a basic connection with the Wiimote

Been working on coding for the Wiimote using C# and have thankfully made some progress. Import the wiimote library and create an object for the wiimote

using WiimoteLib;

Now in the main function
wm.Connect();
wm.SetReportType(InputReport.IRAccel, true);
wm.SetLEDs(true, false, false, false);

This establishes the connection with the wiimote and the SetLeds tells the wiimote to show the first of four lights on the controller.
x = wm.WiimoteState.IRState.IRSensors[0].Position.X.ToString();
y = wm.WiimoteState.IRState.IRSensors[0].Position.Y.ToString();

This saves the coordinates in our strings x and y. You can take a printout or do whatever you want with these values now, still not sure what rate the wiimote is streaming the data at though.

Sunday, May 04, 2008

Capstone Project: Headtracking using Wiimote

I am creating a project similar to Johny Lee's headtracking project using the Nintendo Wii remote for my final year engineering design project. 1st step is ofcourse to get the remote up and running with the existing applications created by Mr Lee. The following steps are required:

  1. Establish a bluetooth connection with the wiimote. Use the tutorial here to accomplish that. After you sync the Wiimote the lights on the remote will continue flashing as if its in sync mode, this is normal as the remote only syncs to controller 1 after the application interfaces with it.
  2. Download and install the latest .NET version and the DirectX SDK for the application to run properly. I spent a lot of time figuring out why the application kept crashing upon startup and it turned out i needed the DirectX SDK and not just DirectX 9.0c .
  3. Fire up the WiiDesktopVR.exe

Photobucket

The next few posts will include a dissection of the code in order to fully understand what is going on here.

Thursday, December 20, 2007

Publishing .NET to an IIS server woes..

Been having trouble at work getting an ASP.NET project to publish on a local dedicated server but ive finally found the simplest method. here goes:

1. With ASP.NET 2.0 there are no precompiled assemblies and everything is runtime compiled so all one needs to do is copy the project folder across to the \intepub\wwwroot\ folder on the server.

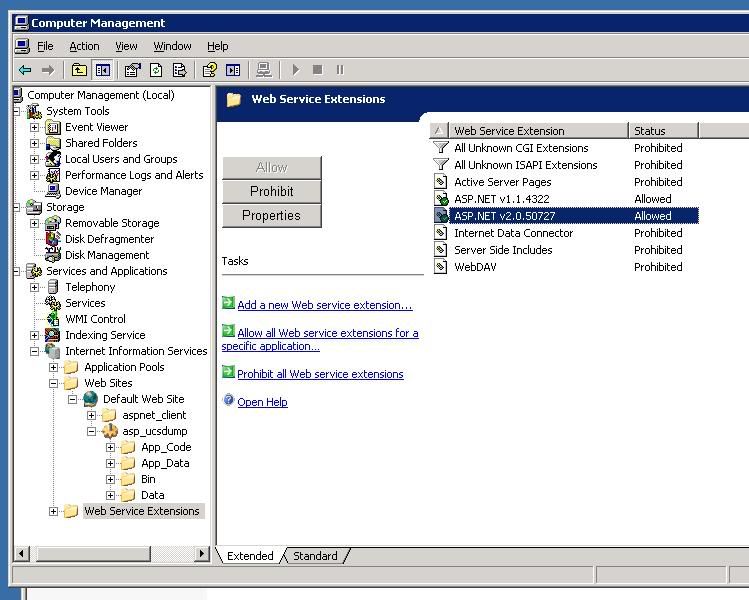
2. Make sure >NET 2.0 has been installed and is linked to IIS. You will know its working when under the IIS manager>Web Service Extensions it shows ASP.NET v2.0 is allowed. If there is no green check mark then select and allow it.

Photobucket

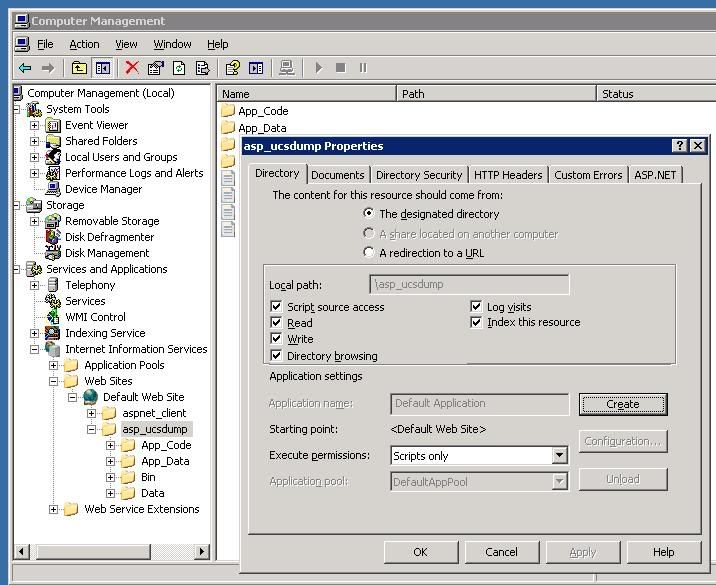
3. Now comes the part where everyone screws up. The .aspx file is now accessible but will always return an error when accessed from the local server or elsewhere on the network. The reason is the virtual directory containing our project files on the server has to be configured as an application in the IIS in order for the ASP code to be compiled at runtime. You will see something like this :

Configuration Error

Description: An error occurred during the processing of a configuration file required to service this request. Please review the specific error details below and modify your configuration file appropriately.

Parser Error Message: It is an error to use a section registered as allowDefinition='MachineToApplication' beyond application level. This error can be caused by a virtual directory not being configured as an application in IIS.

Source Error:

Line 49: ...
Line 50: -->
Line 51:
Line 52:


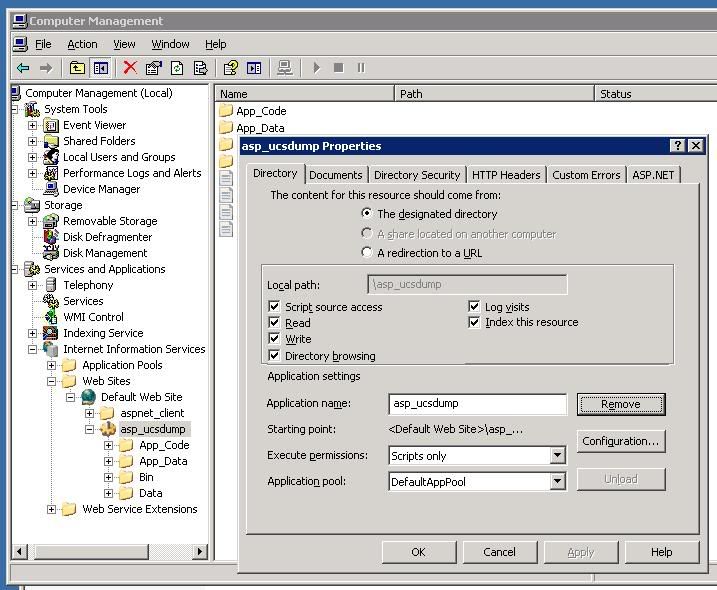
To get around this simply right-click on the website folder under "Default Web Site" in the IIS manager and under the Directory tab under Application settings select create and this registers the application with the IIS.
Photobucket Photobucket

The website should be up and running now. Hope this helps.

Friday, June 29, 2007

The hidden artistic side of technology

To most of us technology is something we come across everyday yet something so un-human if we take a moment to step aside and see how much we interact with it compared to humans we would truly be shocked.

Yet like most of human-kinds creations there is an artistic depth in technology as well. It is not just something cold or hard to the touch but there is so much happening in the background that we may not necessarily see or hear, I speak of forms of expression beyond our perceptions. Enter the IBM 1401 mainframe from the 60's. A scientist using them in Iceland saw that during the operation of the mainframe, memory leaks were causing signals to be broadcast on AM frequencies. Now with some modifications the result :


From : WIRED
Additional composition samples available from Johann Johannsson's website. His father was the one who discovered this back in the 60's.

Thursday, March 22, 2007

Xbox 360 Intercooler Mod

Been hearing a lot of negative stuff about the Nyko intercooler for the Xbox 360 and after doing some digging around i came to the conclusion that having a 3rd party hardware sucking up and disturbing the streamlined power being sent to the console using extremely powerful fans which might have variable power inputs depending on their quaity is good enough to ruin ones 360. But we still need the intercooler as Microsoft has pretty much abandoned us when it comes to cooling their monsters down.

Hence I modded my intercooler. Here are the steps I took :

First off i thought I would simply open the intercooler and disconnect its fans. With the help of an opening I brought the wires out and tried to feed them power via USB.


there was a black and brown wire that I cut and brought out through the opening. The connections inside looked solid ( for the remaining cables ) so i decided to leave everything intact. I closed the intercooler, powered up the USB and gave it a test.


It could have been a disaster, the USB was maxed out at 5V while the fans needed 12 volts at .13 amps each ( power hungry monsters, another reason i dont want them sucking off my 360's power ) and the USB couldnt supply them with enough. The 360 actually became hotter than 2 hrs of Gears of War while it was simply idling !!

I had no choice, i needed a stronger power supply. The sollution : a cheap 350W computer power supply. I rigged the thing to turn on when connected and attached the fans to them and boy was there some cooling to be seen !! An hour of Ghost Recon AW and the 360 felt cooler than it does when its on the dashboard doing nothing !!


All was good but there was still a problem. The power input for the 360 was still comming through the intercooler and i wasnt too happy with this. Given that the cases where the intercooler fries the 360 its power plug leaves a burn mark on the 360 that voids the warranty I decided to get rid of it.

So with the aid of a saw from the dollar store i started off. I cut off the following portion...


.....and was left with....


this way the 360's power cable goes in directly and surprisingly the intercooler seems to be able to balance without its plug going into the 360.


Conclusion : the system is much cooler now and in multiplayer i have actually seen a performance difference ( Played Ghost Recon AW and some huge explosions caused everyones 360 to lag for a second, even the hosts but mine barely stuttered :) Also this allows me to run the fan for a few minutes after i turn off the 360 so that the heat does not stay inside when the internal fans turn off.

Let me know what you guys think.

Thursday, February 15, 2007

Xbox 360 with VGA out

I recently tried out my Xbox 360 with the monster VGA cables on a 22" LG LCD monitor. I have heard several people complaining about the washed out look the VGA cable provides but I have come to realize that it is the LCD monitor that makes the difference. The below pics are of what gaming looks like in the LCD :


Honestly Gears of War looked great. The last level especially was the best test to see if the colors in the sky look rich and vibrant and I would place them around 80% as good as what I have seen on a Samsung 40" LCD tv. The LG lcd ( L204WT ) has a dynamic contrast ratio of 3000:1 and the dark colors look great in comparison to samsung LCD ( 225BW ) but the main thing is the f-engine which increases the richness of the color and makes the experience more HDTV like.

I also tested a DVD on the monitor. Not sure if its true but the 360 upscales a DVD when using the VGA cable. In effect i get a 720p HDTV upscaled output from a 480p dvd. the following screens are from Star Trek Voyager :


The aspect ratio was fullscreen so i used the 360 to soom in to fill my screen and i could not make out any artifacts at all, its was purely amazing !!!

Wednesday, February 07, 2007

Configuring A Network Bridge for the XBox 360 using a Laptop

Here is an amazing way to get your Xbox360 hooked up to your home wireless withoug having to bother about the overpriced M$ wireless connector ( USD $99 approximately )

Will try is ASAP

Thursday, February 01, 2007

AIGLX and Beryl on my humble laptop

cd /etc/yum.repos.d/
wget http://wilsonet.com/packages/beryl/beryl.repo
yum -y install beryl-gnome beryl-kde

beryl-manager

Friday, October 27, 2006

XGL and Beryl on my humble laptop

Finally ditched compiz and installed the latest beryl using the help of this how-to and I am at a loss to explain the beauty i see in front of me !!

the effects are way beter than what compiz had to offer and there are some practicle ones as well such as the ability to select any open window from any desktop with just a single click of the mouse. beryl also comes with the eerald window theme manager which has some exelent themes available to choose from in the default package. have not tried to install new themes yet though.

Pictures cannot do justice to the hard work that has gone into this so heres a movie straight off my desktop


Note : for those installing beryl after trying out compiz like myself you need to remove compiz and xgl completely. i used the package manager and uninstalled them before proceeding with the how-to.